How to Install Oracle 19c on Amazon Linux 2 (2025) | Step-by-Step Guide
Learn how to install Oracle 19c on Amazon Linux 2 (2025) with this step-by-step guide. Includes prerequisites, GUI installation, and configuration tips.
In this guide, we provide a step-by-step process to install Oracle 19c on Amazon Linux 2 using the GUI-based installer. You’ll learn how to configure system requirements, set up necessary users and groups, adjust kernel parameters, and perform the installation with an optional patch application. This tutorial ensures a smooth setup with detailed instructions and GUI screenshots. By the end, you’ll have a fully functional Oracle 19c database running on Amazon Linux 2.
Watch this step-by-step tutorial on how to install Oracle 19c on Amazon Linux 2 (2025) before following the written guide.
Step 1: Check System Kernel Version
Run the following command to check the system’s kernel version and architecture:
uname -aThis command displays detailed system information, including the kernel version, system architecture, and hostname. It helps verify that you are running Amazon Linux 2 and confirm compatibility with Oracle 19c.
Step 2: Install Required Packages
Run the following command to install the necessary dependencies for Oracle 19c using root user:
sudo yum install -y binutils compat-libcap1 compat-libstdc++-33 \
gcc gcc-c++ glibc glibc-devel ksh libaio libaio-devel \
libX11 libXau libXi libXtst libXrender libXrender-devel \
libgcc libstdc++ libstdc++-devel libxcb make smartmontools \
sysstat
Oracle 19c requires specific system libraries and tools to function properly. This command installs essential development tools, runtime libraries, and system utilities, ensuring that all dependencies are met before proceeding with the installation. The -y flag automatically confirms the installation, making the process smoother.
Step 3: Configure System Kernel Parameters
fs.file-max = 6815744
kernel.sem = 250 32000 100 128
kernel.shmmni = 4096
kernel.shmall = 1073741824
kernel.shmmax = 4398046511104
net.ipv4.ip_local_port_range = 9000 65500
net.core.rmem_default = 262144
net.core.rmem_max = 4194304
net.core.wmem_default = 262144
net.core.wmem_max = 1048576
These kernel parameters are required to ensure stable performance and resource allocation for the Oracle Database.
- fs.file-max: Sets the maximum number of open file descriptors.
- kernel.sem: Configures semaphore settings for interprocess communication.
- kernel.shmmax & kernel.shmall: Define shared memory limits for Oracle processes.
- net.ipv4.ip_local_port_range: Expands the available port range for network connections.
- net.core.rmem_* & net.core.wmem_*: Adjust TCP buffer sizes for better network performance.
Step 4: Verify and Apply Kernel Parameter Changes
After updating the /etc/sysctl.conf file with the required kernel parameters, verify and apply the changes using the following commands:
cat /etc/sysctl.confThis command displays the contents of the /etc/sysctl.conf file, allowing you to verify that all required parameters have been correctly added.
sudo sysctl -pThis command applies the new kernel parameters without requiring a system reboot. It ensures that the changes take effect immediately.
sysctl -a | grep oracleThis command checks if any kernel parameters specifically related to Oracle are already set. It helps confirm that the system is properly configured for Oracle Database installation.
Step 5: Disable SELinux
Oracle 19c requires SELinux to be set to Permissive mode to avoid security restrictions. Run the following commands to disable SELinux temporarily and permanently:
setenforce 0This command sets SELinux to Permissive mode temporarily (until the next reboot), allowing Oracle to function without SELinux restrictions.
sed -i 's/^SELINUX=enforcing/SELINUX=permissive/g' /etc/selinux/configThis command modifies the SELinux configuration file (/etc/selinux/config) to ensure that SELinux remains in Permissive mode even after a system reboot. It replaces SELINUX=enforcing with SELINUX=permissive.
To verify the SELinux status, run:
getenforceIf SELinux is in Permissive mode, the output should be:
PermissiveStep 6: Set Resource Limits for the Oracle User
Oracle requires specific resource limits to be set for the oracle user to ensure smooth database operation. Run the following commands as the root user to define these limits in /etc/security/limits.conf file.
echo "oracle   soft   nofile   1024" >> /etc/security/limits.d/oracle.conf
echo "oracle   hard   nofile   65536" >> /etc/security/limits.d/oracle.conf
echo "oracle   soft   nproc    16384" >> /etc/security/limits.d/oracle.conf
echo "oracle   hard   nproc    16384" >> /etc/security/limits.d/oracle.conf
echo "oracle   soft   stack    10240" >> /etc/security/limits.d/oracle.conf
echo "oracle   hard   stack    32768" >> /etc/security/limits.d/oracle.conf
echo "oracle   hard   memlock  134217728" >> /etc/security/limits.d/oracle.conf
echo "oracle soft memlock 134217728" >> /etc/security/limits.d/oracle.conf- nofile (Number of open files): Limits the maximum number of open files per process.
- nproc (Number of processes): Limits the number of user processes allowed.
- stack (Stack size): Defines the maximum stack size for Oracle processes.
- memlock (Memory locking): Ensures Oracle can lock memory pages to prevent them from being swapped out.
To check if the limits are correctly applied, switch to the oracle user and run:
ulimit -aThis will display the configured limits, confirming they have been set correctly.
Step 7: Disable Swap
Oracle 19c requires swap to be disabled for optimal performance. Run the following commands as the root user:
swapoff -aThis command disables swap temporarily (until the next reboot). This is necessary because Oracle Real Application Clusters (RAC) and certain Oracle features perform better without swap.
sed -i '/swap/d' /etc/fstabThis command permanently disables swap by removing any swap-related entries from the /etc/fstab file. This ensures that swap does not get re-enabled after a system reboot.
To confirm that swap has been disabled, run:
free -mThe Swap row in the output should show 0 allocated swap space, indicating that swap is successfully disabled.
Step 8: Disable Firewall
Oracle 19c requires certain network ports to be open, and disabling the firewall ensures smooth communication between components. Run the following commands as root to stop and disable the firewall:
systemctl stop firewalldThis command immediately stops the firewall service, preventing it from blocking any required ports during the installation process.
systemctl disable firewalldThis command ensures that the firewall does not start automatically after a system reboot.
To check the firewall status, run:
systemctl status firewalldIf the firewall is disabled, you should see output indicating that the service is inactive (dead).
Step 9: Create Oracle User and Groups
Oracle requires specific user groups for managing installation, database administration, and operations. Run the following commands as root to create the necessary groups and user:
Create Groups
groupadd -g 54321 oinstall
groupadd -g 54322 dba
groupadd -g 54323 oper- oinstall: Primary group for Oracle installation and software management.
- dba: Grants database administrator privileges.
- oper: Used for database operator tasks like starting/stopping the database.
Create the Oracle User and Assign Groups
useradd -u 54321 -g oinstall -G dba,oper oracle- Creates a user named oracle with UID 54321.
- Assigns oinstall as the primary group.
- Adds the user to the dba and oper groups, granting necessary privileges.
To check the newly created user and group associations, run:
id oracleThe output should display the correct UID, primary group (oinstall), and additional groups (dba, oper).
uid=54321(oracle) gid=54321(oinstall) groups=54322(dba),54323(oper)- The oracle user has the correct UID (54321).
- The primary group is oinstall (GID 54321).
- The user is successfully added to the dba (GID 54322) and oper (GID 54323) groups.
This setup ensures that the Oracle user has the required permissions for installation and database management. ✅
Step 10: Set a Password for the Oracle User
To secure the oracle user account, set a password using the following command:
passwd oracleThis command prompts you to enter a new password for the oracle user. After typing the password, you’ll need to confirm it by re-entering the same password.
To check if the password has been set, try switching to the oracle user:
su - oracleIf the password is correctly set, you should be able to log in as the oracle user without any issues. ✅
Step 11: Create Required Directories and Set Permissions
Oracle 19c requires specific directories for software installation, database storage, and backups. Run the following commands as root to create these directories and set the correct ownership and permissions.
Create Required Directories
mkdir -p /u01/app/oracle/product/19c/db_1
mkdir -p /u02/oracle/oradata
mkdir -p /u02/oracle/FRA
mkdir -p /backup/patch- /u01/app/oracle/product/19c/db_1: Directory for Oracle Database binaries.
- /u02/oracle/oradata: Location for Oracle database data files.
- /u02/oracle/FRA: Fast Recovery Area (FRA) for backups and logs.
- /backup/patch: Directory for storing Oracle patches.
Set Ownership for the Oracle User
chown -R oracle:oinstall /u01
chown -R oracle:oinstall /u02
chown -R oracle:oinstall /backup- Assigns oracle user and oinstall group as the owners of the directories.
- Ensures the oracle user has proper access to manage Oracle files.
Set Permissions
chmod -R 750 /u01/
chmod -R 750 /u02/
chmod -R 750 /backup/- 750 permissions:
- Owner (oracle): Full read, write, and execute permissions (
7). - Group (oinstall): Read and execute permissions (
5). - Others: No access (0).
- Owner (oracle): Full read, write, and execute permissions (
- This ensures that only the oracle user and oinstall group have access to these directories, improving security.
To check if the directories are created and permissions are correctly set, run:
ls -ld /u01 /u02 /backupThe output should show the correct ownership (oracle:oinstall) and permissions (drwxr-x—). ✅
Step 12: Configure Oracle Environment Variables
Switch to the Oracle User
Run the following command as root to switch to the oracle user:
su - oracleCreate and Edit .bash_profile
Run the following command to open the .bash_profile file for editing:
vi ~/.bash_profilePress i to enter insert mode, then add the following environment variables:
export TMP=/tmp
export TMPDIR=$TMP

export ORACLE_HOSTNAME=ip-172-31-47-65.ap-south-1.compute.internal
export ORACLE_UNQNAME=cdb1
export ORACLE_BASE=/u01/app/oracle
export ORACLE_HOME=/u01/app/oracle/product/19c/db_1
export ORACLE_SID=orcl
export ORACLE_TERM=xterm
export BASE_PATH=/usr/sbin:$PATH
export PATH=$ORACLE_HOME/bin:$BASE_PATH
export PATH=$ORACLE_HOME/OPatch:$PATH
export LD_LIBRARY_PATH=$ORACLE_HOME/lib:/lib:/usr/lib
export CLASSPATH=$ORACLE_HOME/JRE:$ORACLE_HOME/jlib:$ORACLE_HOME/rdbms/jlib
Press ESC, then type: :wq!
This writes the changes and exits the file.
Reload the .bash_profile
To apply the changes immediately, run:
. ~/.bash_profile

or

source ~/.bash_profile
Check if the Oracle environment variables are set correctly:
env | grep ORAIt should display values for ORACLE_HOME, ORACLE_SID, ORACLE_BASE, etc., confirming that the environment is properly configured.
Step 13: Download, Rename, and Unzip Oracle 19c Installation Files
After setting up the Oracle environment, download and extract the Oracle 19c database software from using Oracle user.
Navigate to the Installation Directory
cd $ORACLE_HOME
pwd
Expected Output:
/u01/app/oracle/product/19c/db_1This confirms you are in the correct installation directory.
Download Oracle 19c Software
wget -O LINUX.X64_193000_db_home.zip "https://download.oracle.com/otn/linux/oracle19c/190000/LINUX.X64_193000_db_home.zip?AuthParam=1742599078_bde80d998bfe6bff32f3cf05a195e82a"- wget downloads the Oracle 19c ZIP file.
- -O renames the file directly to LINUX.X64_193000_db_home.zip, avoiding long filenames with AuthParam tokens.
Unzip the Installation File
unzip LINUX.X64_193000_db_home.zip -d $ORACLE_HOMEExtracts the installation files into the $ORACLE_HOME directory.
Verify the Extraction
ls -lrtYou should see the extracted installation files inside $ORACLE_HOME, confirming a successful download and unzip.
Step 14: Install Required X11 Packages for GUI Installation
Oracle 19c requires an X11 (X Window System) environment for running the GUI-based installer. Install the necessary X11 packages based on your OS.
# For Amazon Linux 2
# In this video, we will only install these two as our OS is Amazon Linux 2.
sudo yum install -y xorg-x11-xauth
sudo yum install -y xclock xterm

# For Red Hat Enterprise Linux 8 (RHEL 8)
sudo yum install -y xorg-x11-xauth
sudo yum install -y xterm

# Note: The xorg-x11-apps package (which includes xclock) is in the
# CodeReady Linux Builder Repository for RHEL 8, so it's skipped.

# For SUSE Linux Enterprise Server 15 SP1
sudo zypper install -y xauth
sudo zypper install -y xclock

# For Ubuntu Server 18
sudo apt install -y x11-apps
Step 15: Export a False Image for Oracle Installation
Oracle’s installer checks the OS version, and sometimes, it may not recognize newer versions. To bypass compatibility issues, set the CV_ASSUME_DISTID environment variable based on your OS.
# Oracle Linux
export CV_ASSUME_DISTID=OL8  # For Oracle Linux 8
export CV_ASSUME_DISTID=OL7  # For Oracle Linux 7

# Red Hat Enterprise Linux (RHEL)
export CV_ASSUME_DISTID=RHEL8  # For RHEL 8
export CV_ASSUME_DISTID=RHEL7  # For RHEL 7

# Amazon Linux
export CV_ASSUME_DISTID=OL8  # Assume compatibility with Oracle Linux 8

# Ubuntu (Debian-based)
export CV_ASSUME_DISTID=OL8  # Mimic Oracle Linux 8

# SUSE Linux Enterprise Server (SLES)
export CV_ASSUME_DISTID=SLES12  # For SLES 12
export CV_ASSUME_DISTID=SLES15  # For SLES 15

# Sun Solaris (SPARC or x86)
export CV_ASSUME_DISTID=SOLARIS

# CentOS (Now Stream)
export CV_ASSUME_DISTID=RHEL8  # Since CentOS is RHEL-based

# Rocky Linux / AlmaLinux
export CV_ASSUME_DISTID=RHEL8
Persist the Setting for Oracle User
To apply the setting permanently for the oracle user:
vi ~/.bash_profile # Open profileAdd the export command for your OS, then save and exit (:wq!).
. ~/.bash_profile  # Reload profile
echo $CV_ASSUME_DISTID  # Verify setting
Expected Output:
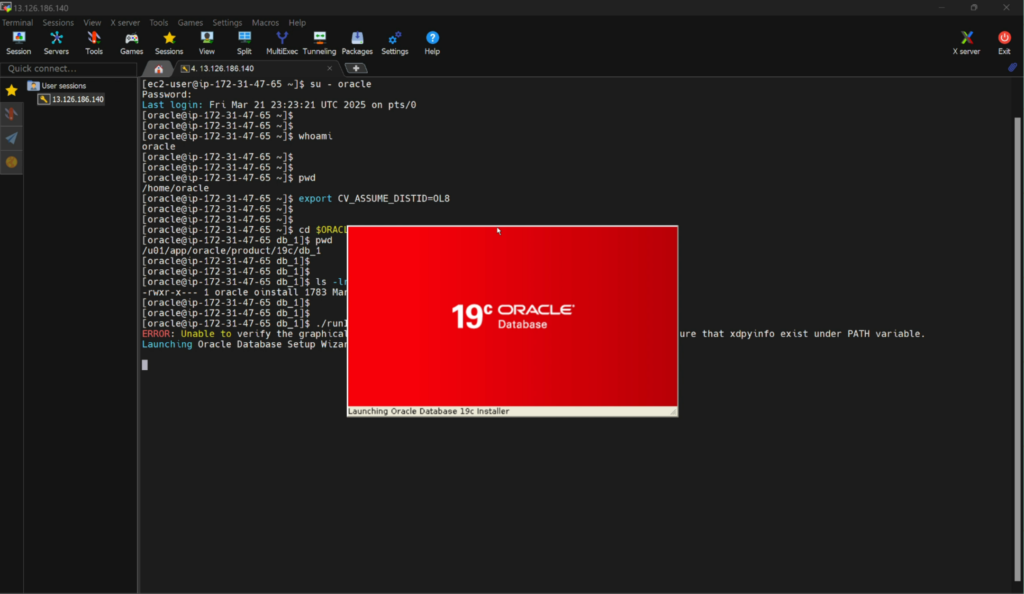
OL8 # or your set valueStep 16: Start Oracle 19c Installer
Now, switch to the oracle user and start the Oracle 19c GUI installer.
Switch to the oracle User
Run the following command from the ec2-user:
su - oracleEnter the oracle user password when prompted.
Verify the Current Directory
Ensure you are in the oracle home directory:
pwd
# Expected Output: /home/oracle
Set the Compatibility Variable
Export the CV_ASSUME_DISTID variable to ensure compatibility:
export CV_ASSUME_DISTID=OEL7.6Start Oracle 19c Installer
cd $ORACLE_HOME
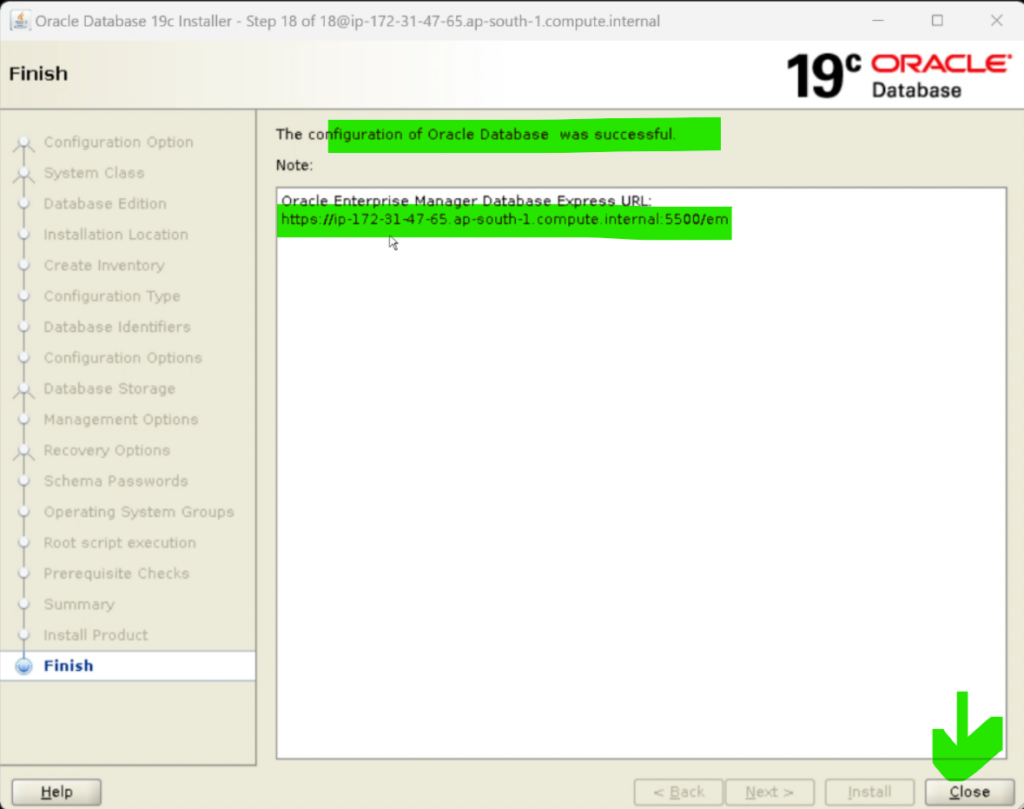
./runInstallerThe Oracle Universal Installer (OUI) GUI will launch. Follow the on-screen steps to complete the installation. ✅
If you want to apply a patch while installing Oracle 19c, use the following command instead of just ./runInstaller:
./runInstaller -applyRU /backup/patch/35943157- -applyRU applies the Release Update (RU) patch before installation completes.
- Replace 35943157 with the correct patch number if using a different patch.
This ensures your Oracle database is installed with the latest updates right from the start!
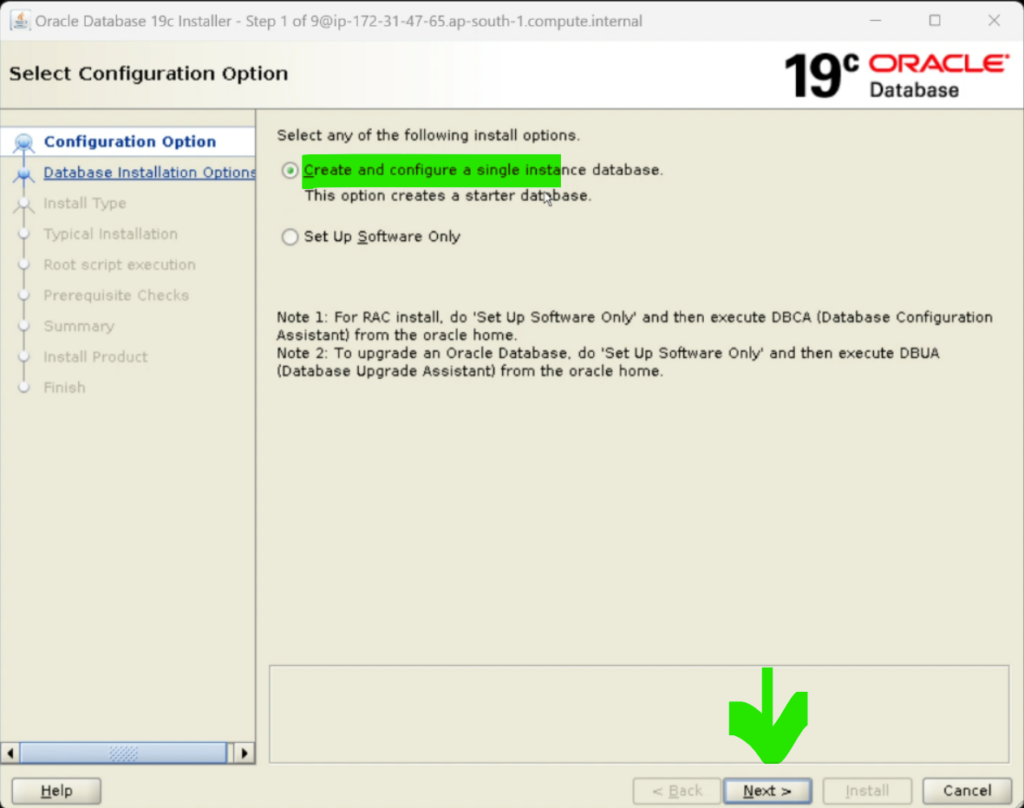
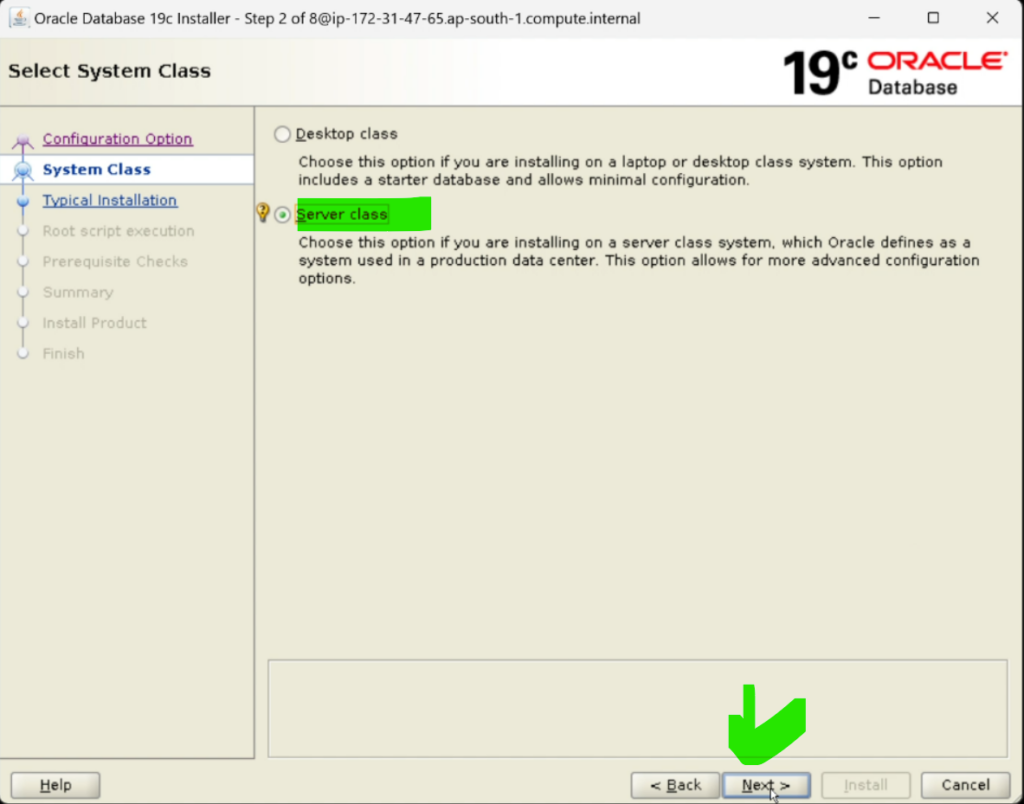
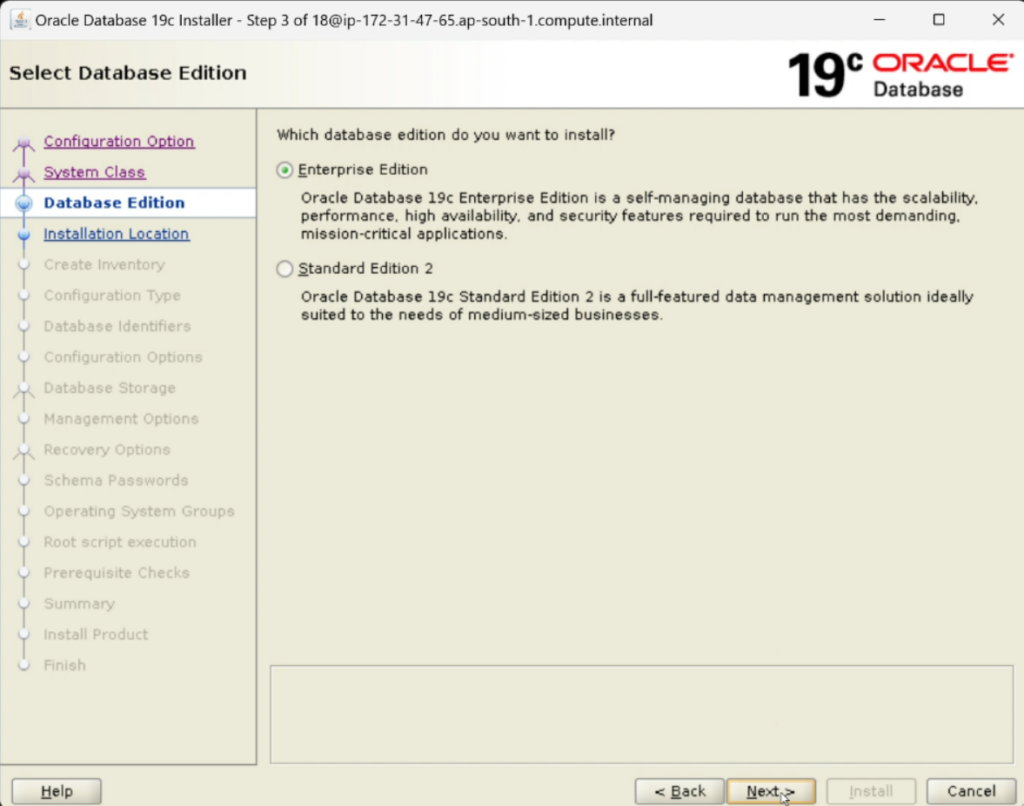
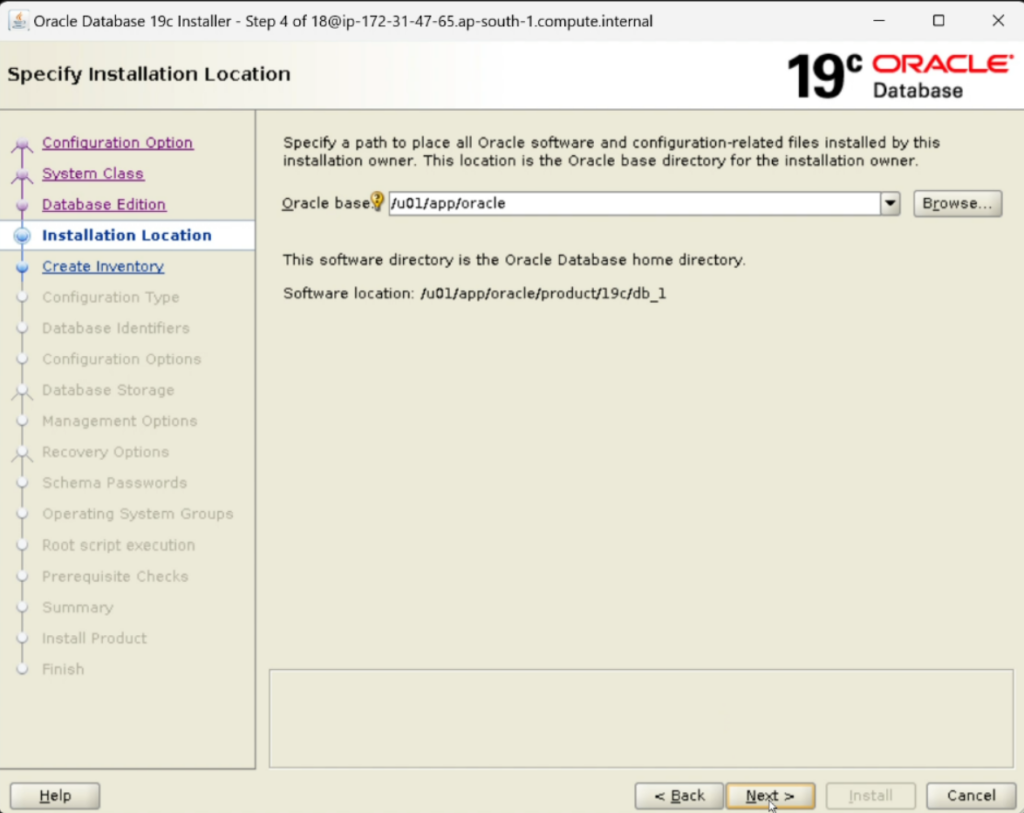
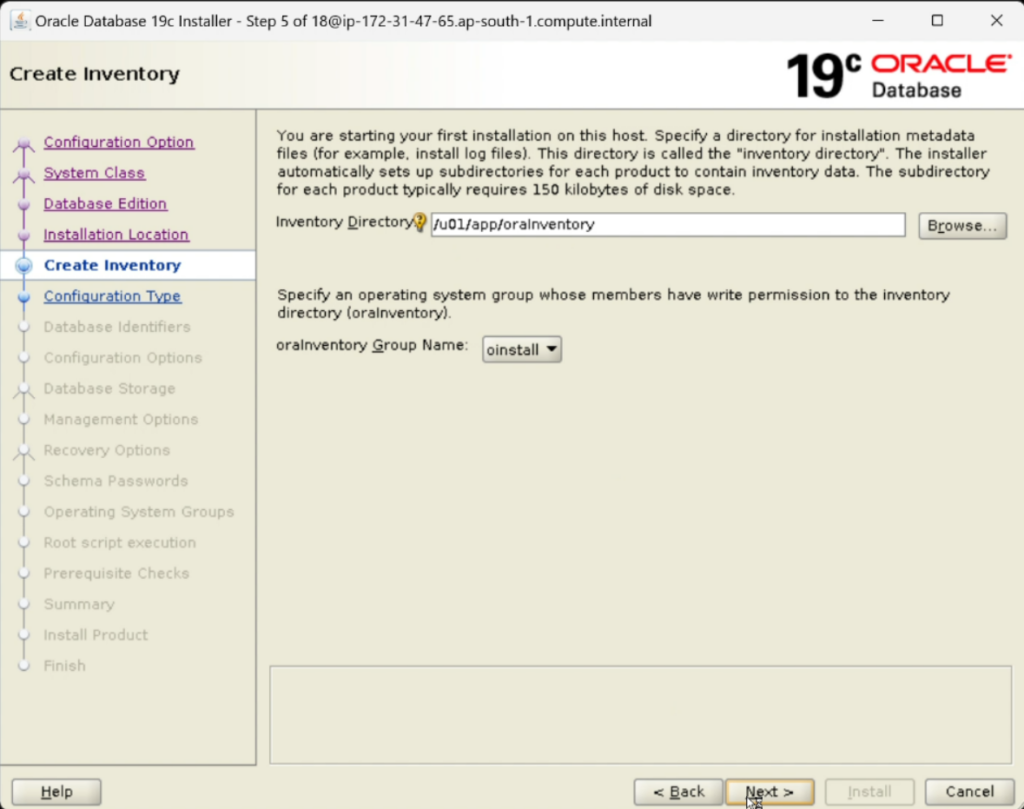
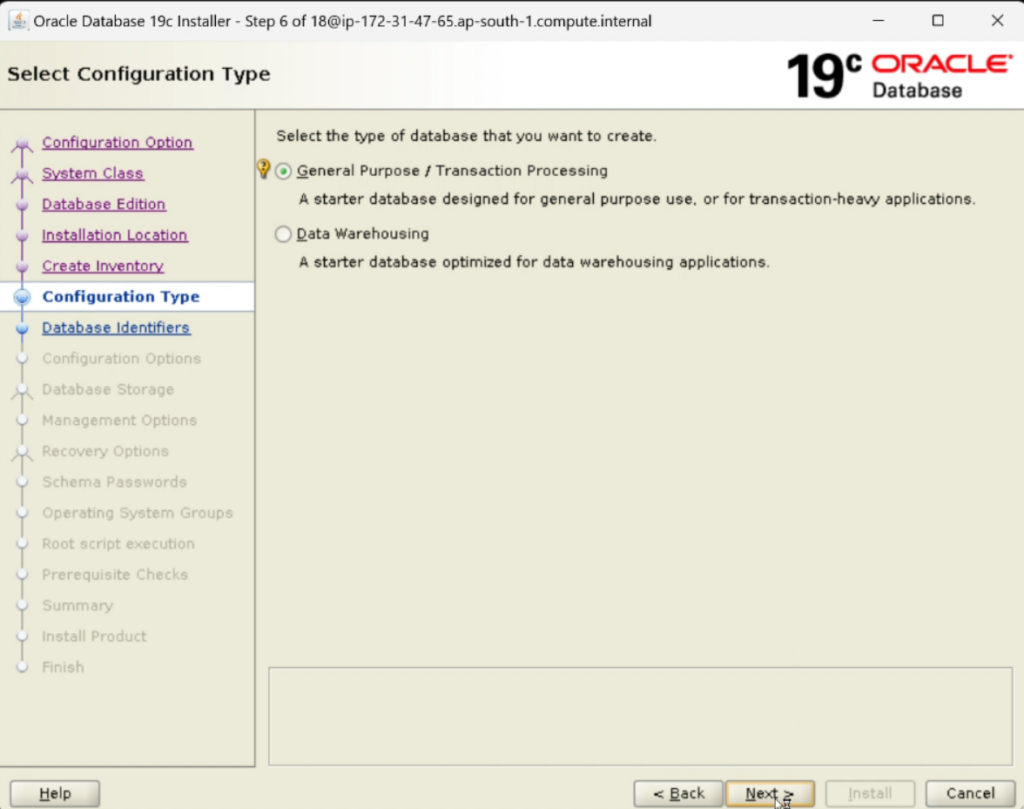
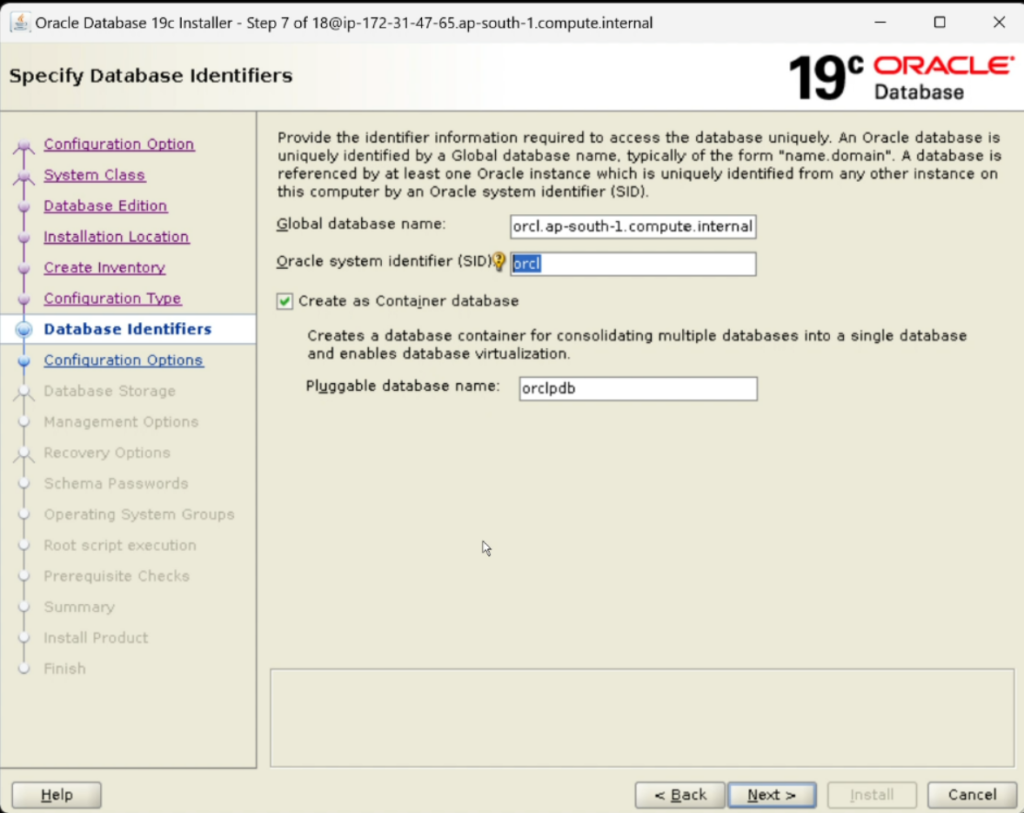
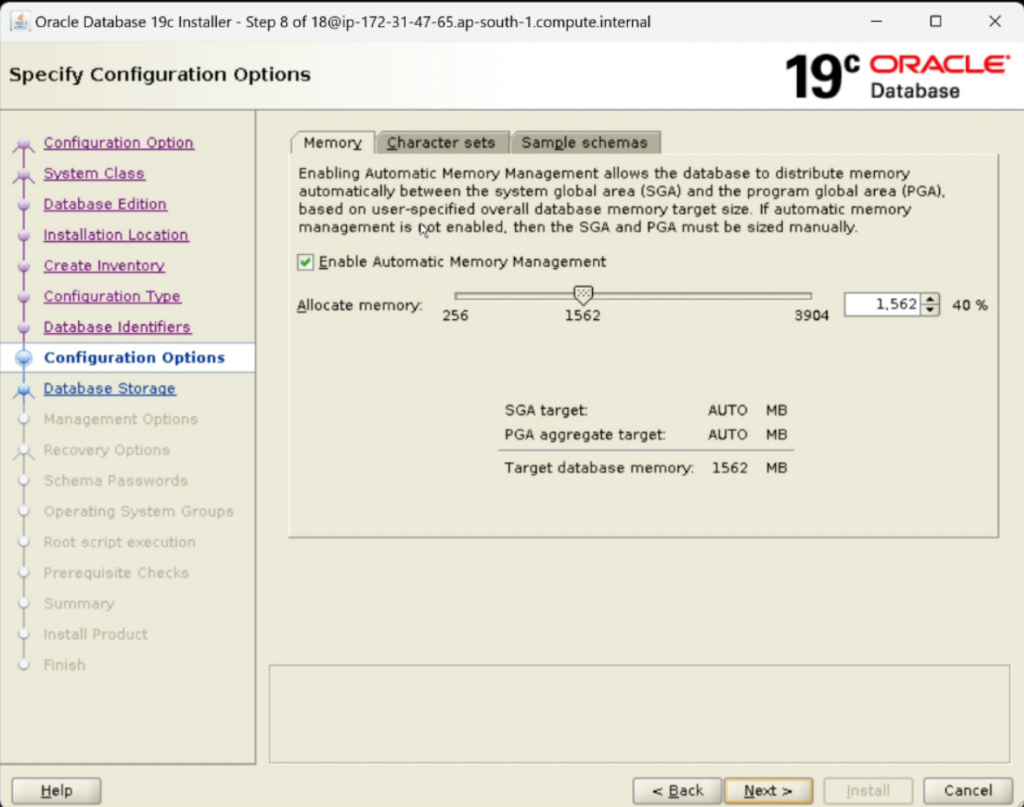
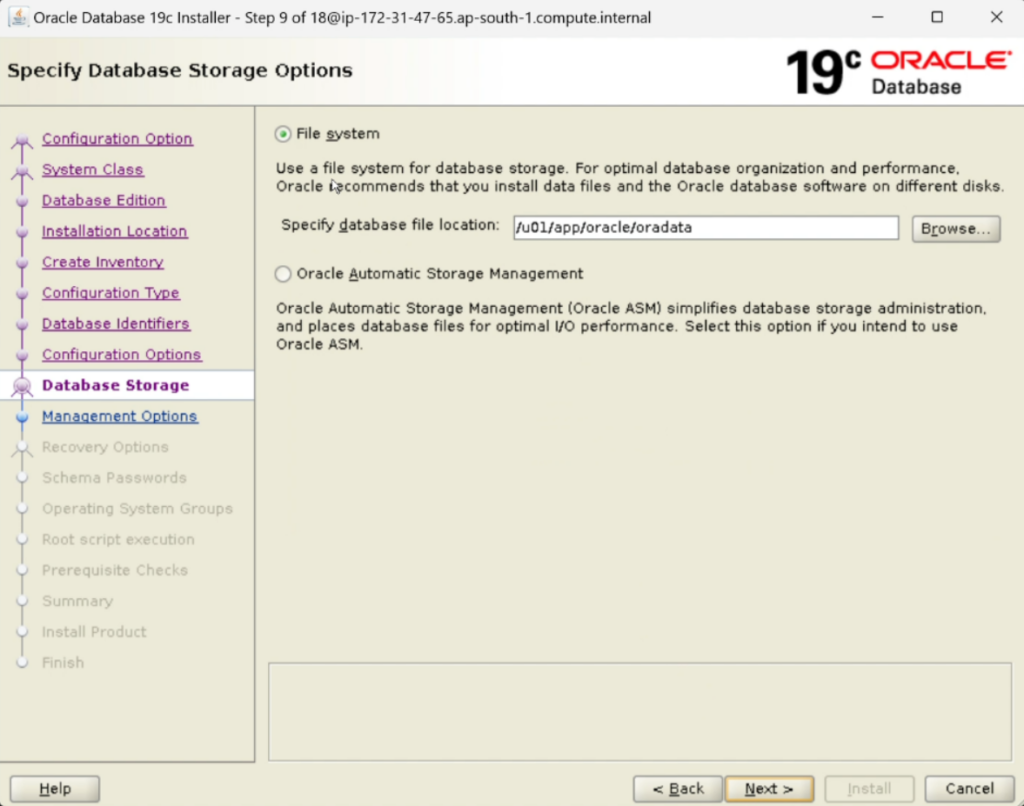
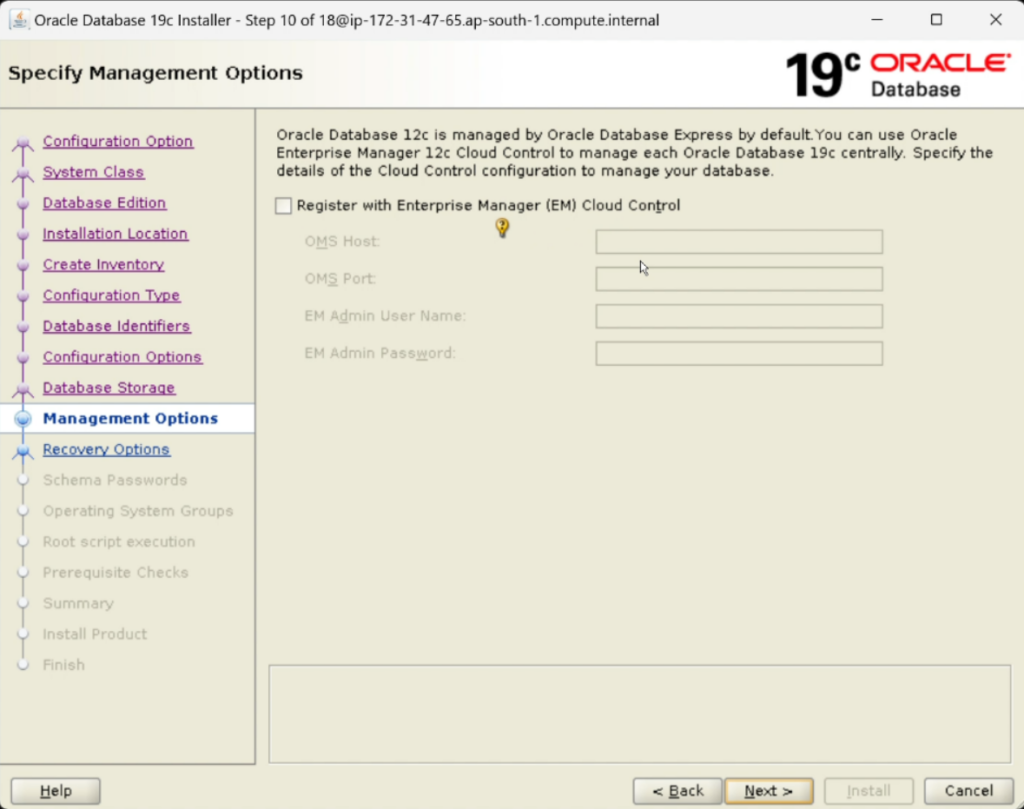
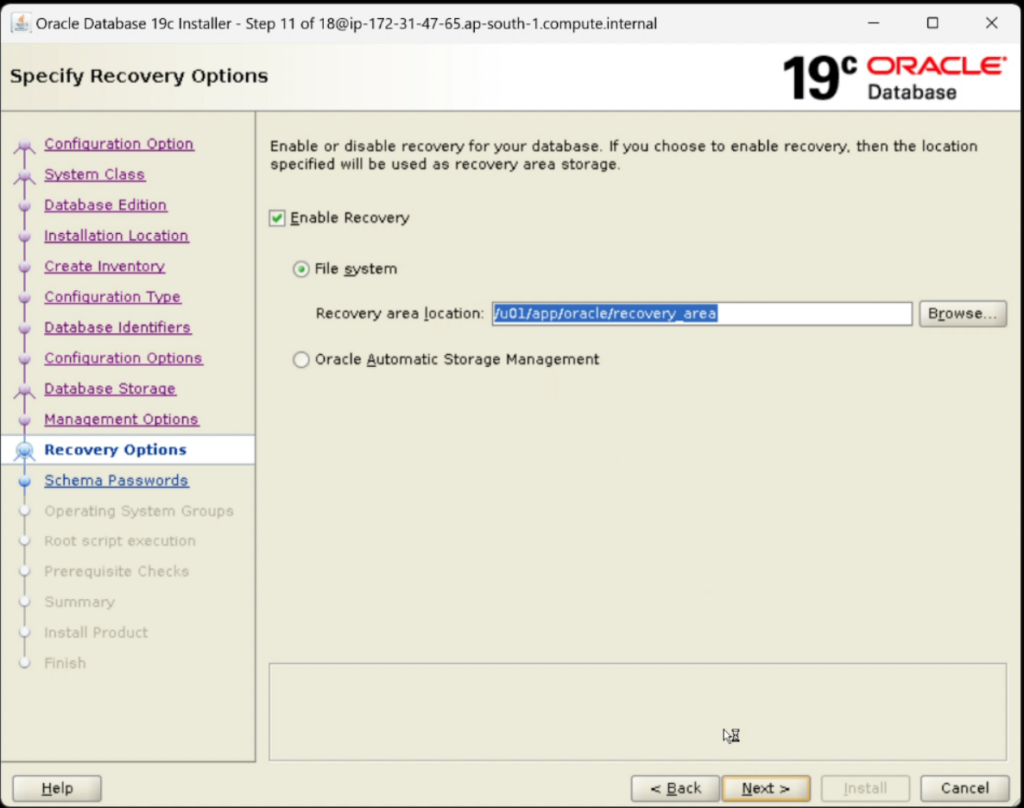
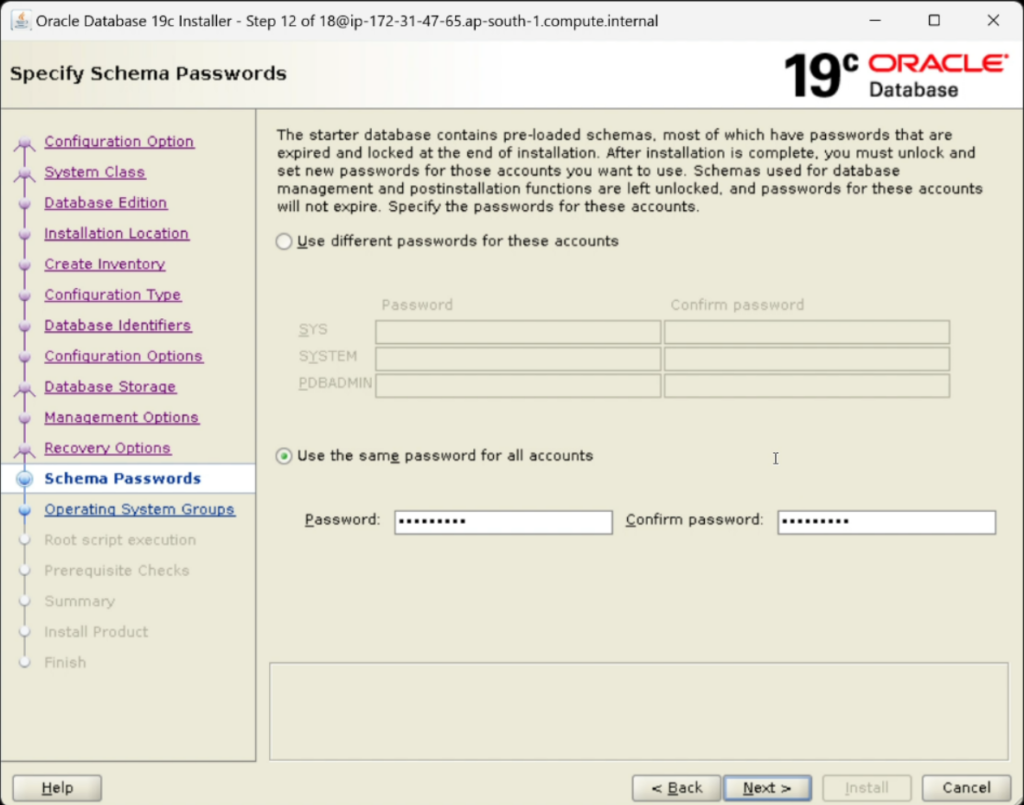
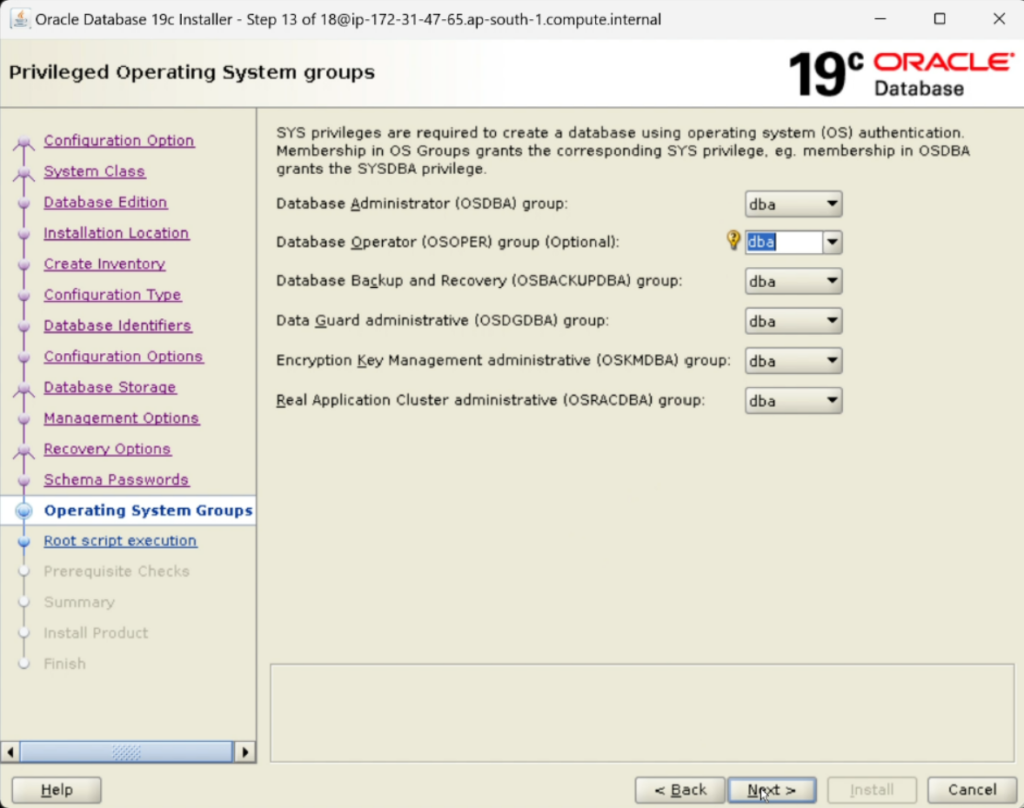
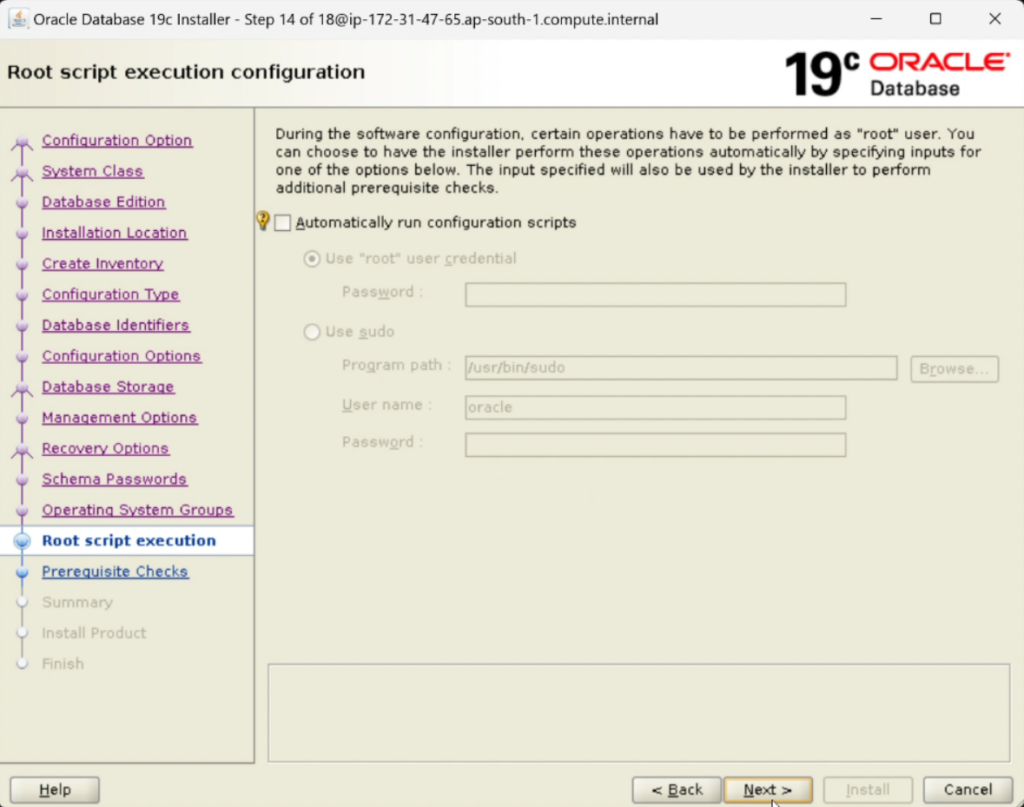
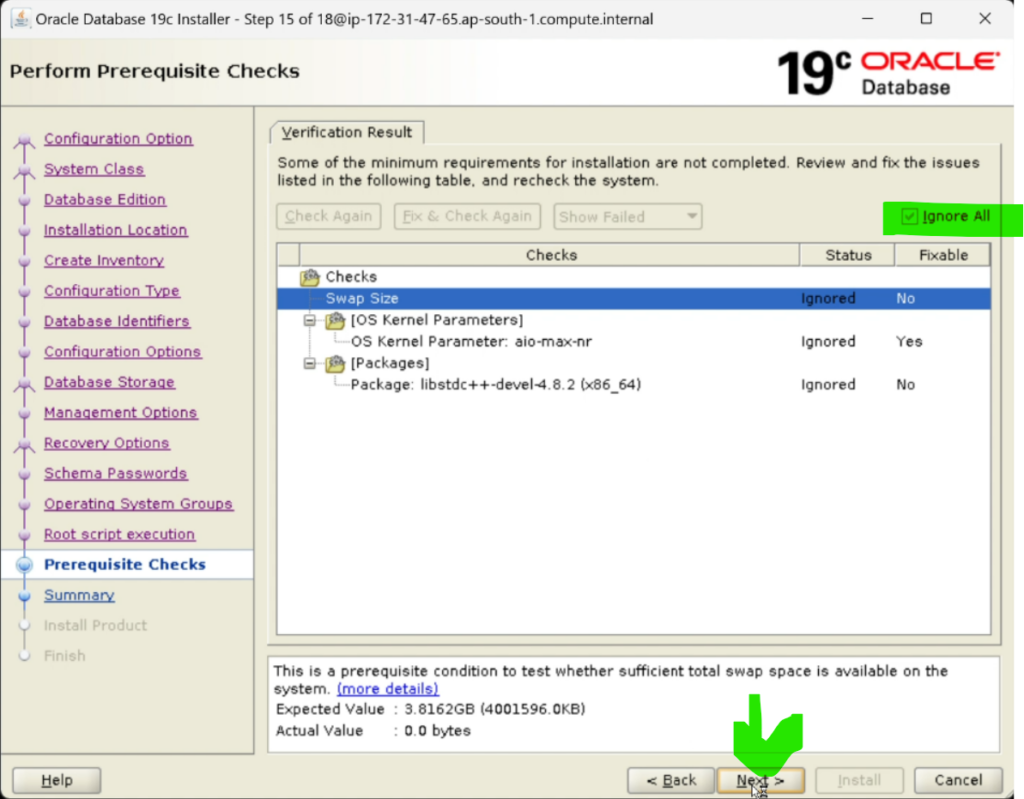
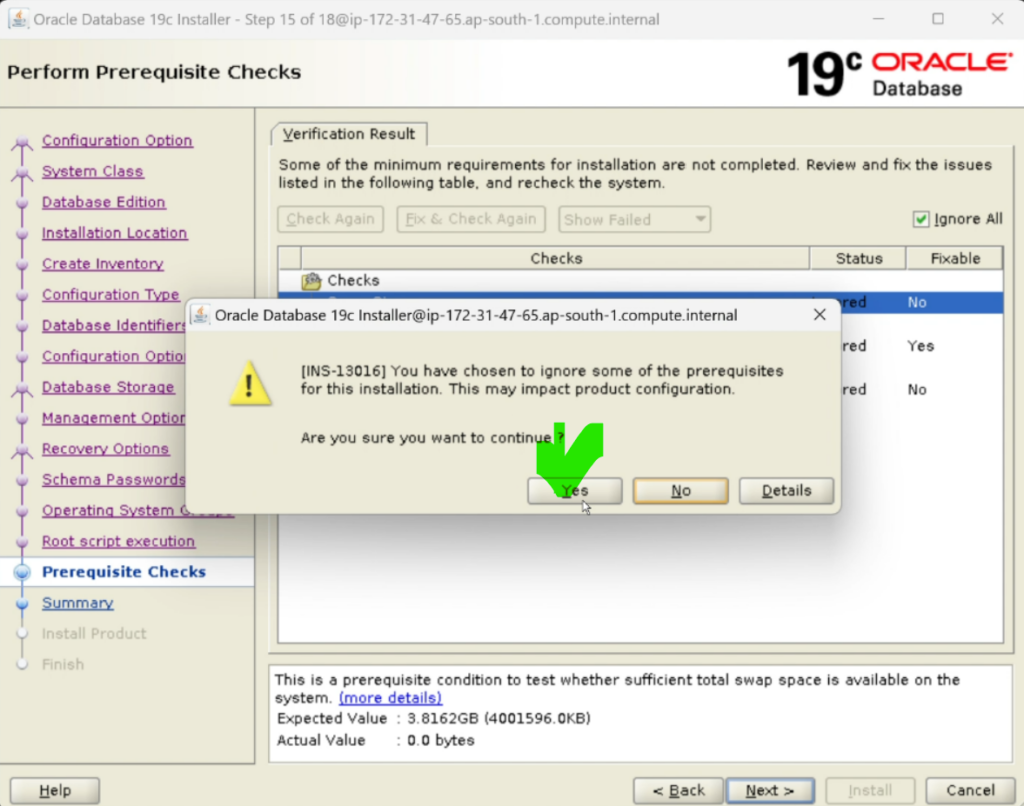
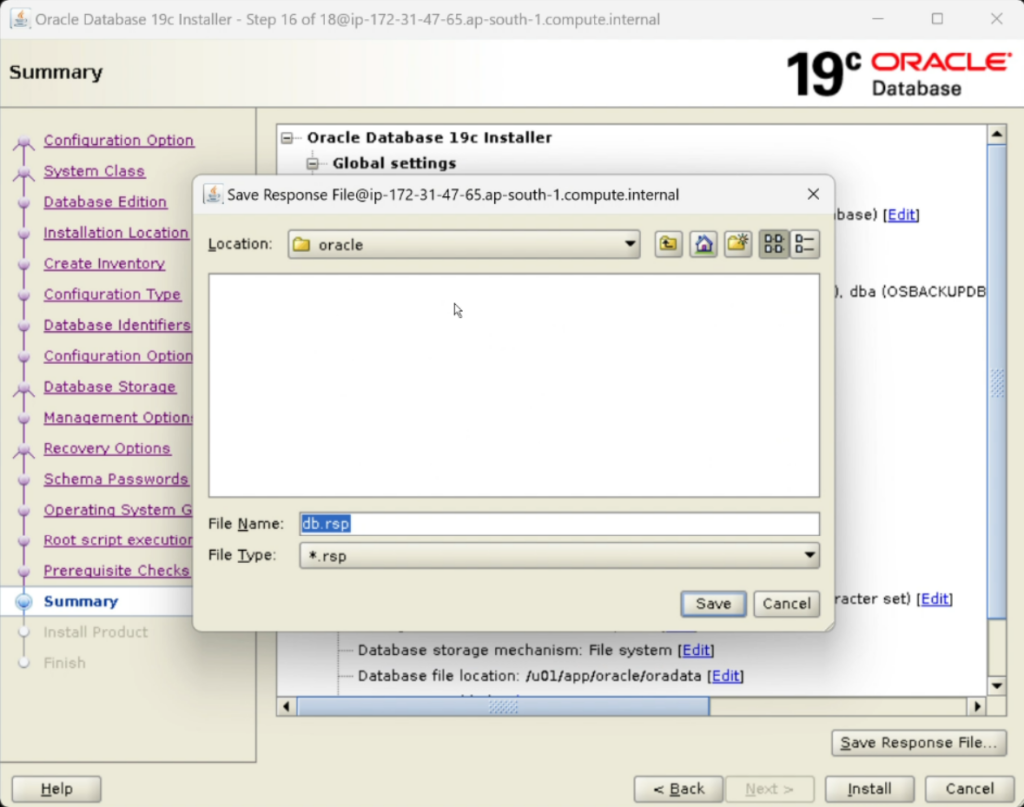
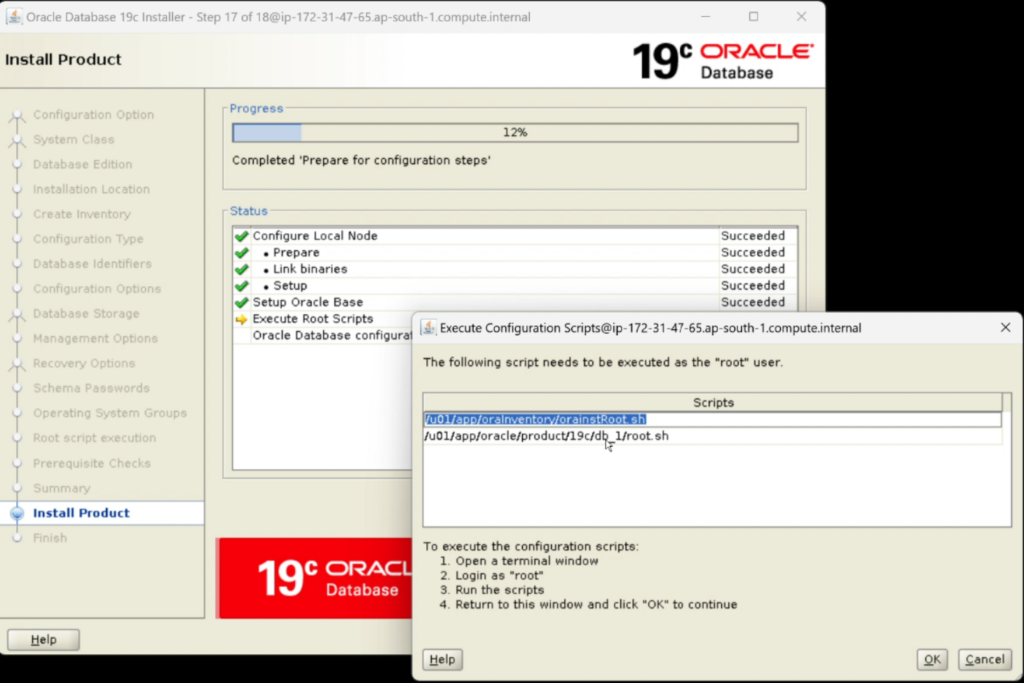
Complete GUI Instructions (Step-by-Step with Screenshots)


Script to Check Database Details
SET PAGESIZE 50
SET LINESIZE 200
SET VERIFY OFF
BREAK ON REPORT SKIP 1
COLUMN section_heading FORMAT A35
COLUMN section_data FORMAT A35
-- Database Information Section
SELECT 'DATABASE INFORMATION' AS section_heading, NULL AS section_data FROM dual
UNION ALL
SELECT NULL, NULL FROM dual  -- Blank line after heading
UNION ALL
SELECT 'Database Name:', db.name FROM v$database db
UNION ALL
SELECT 'Unique Name:', db.db_unique_name FROM v$database db
UNION ALL
SELECT 'Creation Date:', TO_CHAR(db.created, 'DD-MON-YYYY HH24:MI:SS') FROM v$database db
UNION ALL
SELECT 'Open Mode:', db.open_mode FROM v$database db
UNION ALL
SELECT 'Log Mode:', db.log_mode FROM v$database db
UNION ALL
SELECT 'Database Role:', db.database_role FROM v$database db
UNION ALL
SELECT 'Character Set:',
       (SELECT value FROM v$parameter WHERE name = 'nls_character_set') FROM dual
UNION ALL
SELECT 'NCHAR Character Set:',
       (SELECT value FROM v$parameter WHERE name = 'nls_nchar_character_set') FROM dual
UNION ALL
SELECT NULL, NULL FROM dual  -- Blank line after section
-- Instance Information Section
UNION ALL
SELECT 'INSTANCE INFORMATION' AS section_heading, NULL AS section_data FROM dual
UNION ALL
SELECT NULL, NULL FROM dual  -- Blank line after heading
UNION ALL
SELECT 'Instance Name:', inst.instance_name FROM v$instance inst
UNION ALL
SELECT 'Host Name:', inst.host_name FROM v$instance inst
UNION ALL
SELECT 'Startup Time:', TO_CHAR(inst.startup_time, 'DD-MON-YYYY HH24:MI:SS') FROM v$instance inst
UNION ALL
SELECT 'Instance Status:', inst.status FROM v$instance inst
UNION ALL
SELECT 'Database Status:', inst.database_status FROM v$instance inst
UNION ALL
SELECT 'Logins Allowed:', inst.logins FROM v$instance inst
UNION ALL
SELECT 'Version:', inst.version FROM v$instance inst
UNION ALL
SELECT NULL, NULL FROM dual  -- Blank line after section
;